
今回は、モダンなWebアプリケーションの認証で広く使われているOpenID Connect (OIDC)について、Python (Flask) で実装されたシンプルなサンプルコードを動かしながら、その仕組みを解説していきます。
「OAuth 2.0は知っているけど、OIDCとの違いがよくわからない」「ID連携の具体的な流れをコードレベルで見てみたい」という方はご覧ください。
・PythonとFlaskを使ったOpenID Connerctの実装方法がわかります。
この記事のプログラムは、以下の環境で開発および動作確認を行っています
・OS: Windows11
・言語: Python 3.13
・Webフレームワーク: Flask 3.1.1
OIDCの概要。OIDCの必要性。
OIDC (OpenID Connect) は、一言で言うと OAuth 2.0をベースにした認証のための仕組みです。
OAuth 2.0は、リソースへのアクセス許可(認可)を行うためのプロトコルです。例えば、「このアプリケーションが、あなたのGoogleフォトのアルバムにアクセスすることを許可しますか?」といった同意画面は、OAuth 2.0の仕組みで実現されています。
しかし、OAuth 2.0だけでは「このユーザーは誰なのか?」という認証に関する標準的な方法が定められていませんでした。そこで、OAuth 2.0の認可フローの上に「IDトークン」という概念を追加し、認証機能を実現したのがOIDCです。
OIDCを使うことで、以下のようなメリットがあります。
- シングルサインオン (SSO) の実現: GoogleやFacebook、自社の認証サーバーなどで一度ログインすれば、複数のサービスに再度パスワードを入力することなくログインできます。
- セキュリティの向上: 認証処理を専門の認証サーバー(IdP)に集約することで、各アプリケーションが個別にパスワードを管理する必要がなくなり、安全性が高まります。
- 開発の簡素化: 認証という複雑な処理を自前で実装する必要がなくなり、開発者は本来のアプリケーションの機能開発に集中できます。
- 。
OIDCの登場人物と認証フロー
OIDCの基本的な流れ(今回は認可コードフローを例にします)は、以下の登場人物によって進められます。
- ユーザー: サービスを利用したい本人。
- RP (Relying Party): ユーザーが利用したいアプリケーション(クライアント)。IdPを信頼して認証を任せます。
- IdP (Identity Provider): ユーザーの認証を行い、身元情報(IDトークン)を提供するサーバー。
フローを文章で説明すると、以下のようになります。
- [ユーザー → RP] ユーザーがRPのWebサイトで「ログイン」ボタンをクリックします。
- [RP → ユーザー(ブラウザ経由) → IdP] RPはIdPの認証エンドポイントへのリダイレクトURLを生成し、ユーザーをIdPに飛ばします。
- [ユーザー ⇔ IdP] ユーザーはIdPでIDとパスワードを入力して認証します。
- [IdP → ユーザー(ブラウザ経由) → RP] 認証が成功すると、IdPは認可コードを発行し、ユーザーをRPの指定したリダイレクトURIに戻します。
- [RP → IdP] RPは受け取った認可コードを使い、バックエンド通信でIdPのトークンエンドポイントにアクセスします。
- [IdP → RP] IdPは認可コードを検証し、問題がなければIDトークンとアクセストークンをRPに返します。
- [RP] RPはIDトークンの正当性を検証し、中に含まれるユーザー情報を取得してログインセッションを開始します。
この流れを、実際のコードで見ていきましょう。
サンプルプログラムの紹介
今回は、OIDCのフローを体験するために2つのPythonスクリプトを用意しました。
OIDC_idp.py: Identity Provider (IdP) の役割を果たす認証サーバーです。OIDC_rp.py: Relying Party (RP) の役割を果たすクライアントアプリケーションです。
どちらもPythonのWebフレームワークであるFlaskと、OAuth/OIDCライブラリのAuthlibを使って実装されています。
1. Identity Provider (IdP) のコード解説 (OIDC_idp.py)
まずは、ユーザー認証とIDトークンの発行を行うIdP側のコードです。 このサーバーは http://127.0.0.1:5001 で動作します。
主な役割:
- ユーザーデータベース(今回はメモリ上の辞書)を持つ。
- ログイン画面を提供し、ユーザー認証を行う。
- クライアント(RP)の情報を管理する。
- OIDCの各種エンドポイント(認可、トークン、メタデータ)を提供する。
# -*- coding: utf-8 -*-
import os
import warnings
from authlib.deprecate import AuthlibDeprecationWarning
warnings.filterwarnings('ignore', category=AuthlibDeprecationWarning)

from flask import Flask, request, render_template_string, redirect, url_for, session, jsonify
from authlib.integrations.flask_oauth2 import AuthorizationServer
from authlib.jose import jwk
from authlib.oidc.core import UserInfo
from authlib.oauth2.rfc6749 import grants
from authlib.oidc.core import grants as oidc_grants

# 開発環境でHTTPを許可
os.environ['AUTHLIB_INSECURE_TRANSPORT'] = 'true'

# ============================================================================
#  1. セットアップと設定
# ============================================================================
app = Flask(__name__)
app.secret_key = 'super-secret-key-for-session'
app.config.update({
    'SERVER_NAME': '127.0.0.1:5001',
    'SESSION_COOKIE_NAME': 'idp_session'  # クッキー名を指定
})

# --- シンプルなHTMLテンプレート (変更なし) ---
login_template = """
<!DOCTYPE html><html><head><title>ログイン</title></head><body>
    <h2>認証サーバーでログイン</h2>
    <p>ユーザー名: <strong>demo</strong><br>パスワード: <strong>DemoTest2024!</strong></p>
    <form method="post">
        <input type="hidden" name="client_id" value="{{ client_id }}">
        <input type="hidden" name="redirect_uri" value="{{ redirect_uri }}">
        <input type="hidden" name="scope" value="{{ scope }}">
        <input type="hidden" name="response_type" value="{{ response_type }}">
        <input type="hidden" name="nonce" value="{{ nonce }}">
        ユーザー名: <input name="username" value="demo"><br>パスワード: <input name="password" type="password" value="DemoTest2024!"><br>
        <input type="submit" value="ログインして許可">
    </form></body></html>
"""
consent_template = """
<!DOCTYPE html><html><head><title>認可</title></head><body>
    <h2>{{ client.client_name }} が以下の許可を求めています</h2>
    <p>スコープ: <strong>{{ scopes }}</strong></p>
    <form method="post">
        <input type="hidden" name="client_id" value="{{ client_id }}">
        <input type="hidden" name="redirect_uri" value="{{ redirect_uri }}">
        <input type="hidden" name="scope" value="{{ scope }}">
        <input type="hidden" name="response_type" value="{{ response_type }}">
        <input type="hidden" name="nonce" value="{{ nonce }}">
        <input type="submit" name="confirm" value="許可する">
        <input type="submit" name="cancel" value="キャンセル">
    </form></body></html>
"""

# ============================================================================
#  2. 認証サーバー (OIDC Identity Provider) の実装
# ============================================================================

# --- 認可コードクラス定義 ---
class AuthorizationCode:
    def __init__(self, code, client_id, redirect_uri, scope, user):
        self.code = code
        self.client_id = client_id
        self.redirect_uri = redirect_uri
        self.scope = scope
        self.user = user

    def get_redirect_uri(self):
        return self.redirect_uri

    def get_scope(self):
        return self.scope

# --- クライアントクラス定義 ---
class Client:
    def __init__(self, client_id, client_secret, client_name, redirect_uris, scope, response_types, grant_types, token_endpoint_auth_method):
        self.client_id = client_id
        self.client_secret = client_secret
        self.client_name = client_name
        self.redirect_uris = redirect_uris
        self.scope = scope
        self.response_types = response_types
        self.grant_types = grant_types
        self.token_endpoint_auth_method = token_endpoint_auth_method

    def check_redirect_uri(self, redirect_uri):
        return redirect_uri in self.redirect_uris

    def check_response_type(self, response_type):
        return response_type in self.response_types

    def check_grant_type(self, grant_type):
        return grant_type in self.grant_types

    def check_client_secret(self, client_secret):
        return self.client_secret == client_secret

    def check_endpoint_auth_method(self, method, endpoint):
        if endpoint == 'token':
            return method == self.token_endpoint_auth_method
        return False

    def get_allowed_scope(self, scope):
        # リクエストされたスコープがクライアントのスコープに含まれているかチェック
        if isinstance(scope, str):
            requested_scopes = scope.split(' ')
        else:
            requested_scopes = scope or []

        client_scopes = self.scope.split(' ') if isinstance(self.scope, str) else self.scope
        allowed_scopes = [s for s in requested_scopes if s in client_scopes]
        return ' '.join(allowed_scopes)

# --- インメモリDB代わりの変数 ---
db_users = {'demo': {'password': 'DemoTest2024!', 'id': '1', 'name': 'Demo User'}}
client1 = Client(
    client_id='client1',
    client_secret='client1-secret',
    client_name='Relying Party クライアントアプリ ',
    redirect_uris=['http://127.0.0.1:5002/auth'],
    scope='openid profile email api.access rp.login',
    response_types=['code'],
    grant_types=['authorization_code'],
    token_endpoint_auth_method='client_secret_basic'
)
db_clients = {'client1': client1}
db_auth_codes = {}

# --- トークンストレージ ---
db_tokens = {}

# --- 認証サーバーのコアロジック ---
def query_client(client_id):
    client_info = db_clients.get(client_id)
    if client_info:
        # client_infoが既にClientオブジェクトの場合、そのまま返す
        if isinstance(client_info, Client):
            return client_info
        # 辞書の場合、Clientオブジェクトに変換して返す
        return Client(**client_info)
    return None

def save_token(token, request):
    # トークンをメモリに保存(実際の実装では永続化)
    client_id = request.client.client_id
    user_id = token.get('sub') if token.get('sub') else request.user.get('id') if request.user else None

    token_key = f"{client_id}_{user_id}"
    db_tokens[token_key] = token
    print(f"DEBUG: Token saved for {token_key}")

def generate_user_info(user, scope):
    user_info = UserInfo(sub=user['id'])
    if 'profile' in scope: user_info['name'] = user['name']
    if 'email' in scope: user_info['email'] = f"{user['id']}@example.com"
    return user_info

# Authlibの推奨するクラスベースの認証フロー定義
class MyAuthorizationCodeGrant(grants.AuthorizationCodeGrant):
    def save_authorization_code(self, code, request, grant=None):
        # ユーザー情報も含めて保存
        user_id = request.user.get('id') if request.user else None
        user = next((u for u in db_users.values() if u['id'] == user_id), None) if user_id else None

        auth_code = AuthorizationCode(
            code=code,
            client_id=request.payload.client_id,
            redirect_uri=request.payload.redirect_uri,
            scope=request.payload.scope,
            user=user
        )
        db_auth_codes[code] = auth_code
        return code

    def query_authorization_code(self, code, client):
        auth_code = db_auth_codes.get(code)
        if auth_code and auth_code.client_id == client.client_id:
            return auth_code

    def delete_authorization_code(self, authorization_code):
        code = authorization_code.code
        if code in db_auth_codes:
            del db_auth_codes[code]

    def authenticate_user(self, authorization_code):
        return authorization_code.user

class MyOIDCGrant(MyAuthorizationCodeGrant, oidc_grants.OpenIDCode):
    def get_jwt_config(self, grant):
        return {
            'key': app.secret_key, 'alg': 'HS256',
            'iss': 'http://127.0.0.1:5001',
            'aud': grant.client.client_id if hasattr(grant, 'client') else self.request.client.client_id,
        }

    def generate_user_info(self, user, scope):
        return generate_user_info(user, scope)

    def exists_nonce(self, nonce, request):
        # Nonceの検証を簡素化(実際の実装では適切に検証)
        return True

# Authlibサーバーを初期化
auth_server = AuthorizationServer(app, query_client=query_client, save_token=save_token)
auth_server.register_grant(MyOIDCGrant)

# --- 認証サーバーのエンドポイント ---
@app.route('/oauth/authorize', methods=['GET', 'POST'])
def authorize():
    if request.method == 'GET':
        # Show login page for GET requests
        return render_template_string(login_template, **request.args)

    # Handle POST requests (login and consent)
    if request.method == 'POST':
        # Check if this is a consent confirmation (user clicked "許可する")
        if request.form.get('confirm'):
            # User confirmed consent - get user from session
            user_id = session.get('user_id')
            if user_id:
                user = next((u for u in db_users.values() if u['id'] == user_id), None)
                if user:
                    # Create authorization response with authenticated user
                    return auth_server.create_authorization_response(grant_user=user)
            # If no valid session, redirect to login
            return render_template_string(login_template, error="Session expired, please login again", **request.form)

        # Check if user cancelled consent
        if request.form.get('cancel'):
            redirect_uri = request.form.get('redirect_uri')
            return redirect(f"{redirect_uri}?error=access_denied")

        # Process login form (username and password provided)
        username = request.form.get('username')
        password = request.form.get('password')

        if username and password:
            user = db_users.get(username)
            if user and user['password'] == password:
                session['user_id'] = user['id'] # Store user_id in session

                # Show consent page after successful login
                client_id = request.form.get('client_id')
                client = query_client(client_id)
                scope = request.form.get('scope', '').split()
                return render_template_string(
                    consent_template,
                    client=client,
                    scopes=' '.join(scope),
                    **request.form
                )
            else:
                # Login failed, re-show login form with error
                return render_template_string(
                    login_template,
                    error="Invalid username or password",
                    **request.form
                )

    return "Method not allowed", 405

@app.route('/oauth/token', methods=['POST'])
def issue_token():
    print(f"DEBUG: auth_server object: {auth_server}")
    print(f"DEBUG: auth_server has validate_authorization_request: {hasattr(auth_server, 'validate_authorization_request')}")
    return auth_server.create_token_response()

@app.route('/oauth/jwks')
def jwks_endpoint():
    key = jwk.dumps(app.secret_key, kty='oct')
    return jsonify({'keys': [key]})

@app.route('/oauth/userinfo')
def userinfo_endpoint():
    # 簡易実装: Bearerトークンは無視してデモユーザー情報を返す
    return jsonify({
        'sub': '1',
        'name': 'Demo User',
        'email': '1@example.com'
    })

# ============================================================================
#  3. OIDC メタデータ・エンドポイント
# ============================================================================

@app.route('/.well-known/openid-configuration')
def oidc_metadata():
    return jsonify({
        "issuer": "http://127.0.0.1:5001",
        "authorization_endpoint": "http://127.0.0.1:5001/oauth/authorize",
        "token_endpoint": "http://127.0.0.1:5001/oauth/token",
        "userinfo_endpoint": "http://127.0.0.1:5001/oauth/userinfo",
        "jwks_uri": "http://127.0.0.1:5001/oauth/jwks",
        "response_types_supported": ["code"],
        "subject_types_supported": ["public"],
        "id_token_signing_alg_values_supported": ["HS256"],
        "scopes_supported": ["openid", "profile", "email", "api.access", "rp.login"],
        "token_endpoint_auth_methods_supported": ["client_secret_basic"],
        "claims_supported": ["sub", "name", "email"]
    })

# ============================================================================
#  4. 実行 (変更なし)
# ============================================================================
if __name__ == "__main__":
    print("OIDC認証サーバー (Provider) を http://127.0.0.1:5001 で起動します")
    print("別途、クライアントアプリ (Stateless_OIDC_client.py) を起動してください")
    app.run(port=5001, debug=True)
コードのポイント
AuthorizationServerの初期化:auth_server = AuthorizationServer(app, ...)でAuthlibの認証サーバーをセットアップしています。query_client関数を渡すことで、登録済みクライアントの情報をサーバーに教えています。- OIDCグラントの登録:
auth_server.register_grant(MyOIDCGrant)で、認可コードフローにOIDCの機能(IDトークン発行など)を追加したMyOIDCGrantクラスを登録しています。 /oauth/authorizeエンドポイント: 認可エンドポイントです。ユーザーを認証し、同意を得た後、認可コードを発行してRPにリダイレクトします。図のフロー(3)〜(6)を担当します。/oauth/tokenエンドポイント: トークンエンドポイントです。RPから送られてきた認可コードを検証し、IDトークンとアクセストークンを発行します。図のフロー(8)〜(9)を担当します。/.well-known/openid-configurationエンドポイント: OIDC Discovery のための重要なエンドポイントです。RPは、このURLにアクセスするだけで、認可エンドポイントのURLやトークンエンドポイントのURLなどを自動で知ることができます。
2. Relying Party (RP) のコード解説 (OIDC_rp.py)
次に、IdPを信頼して認証を任せるクライアントアプリケーション側のコードです。 こちらは http://127.0.0.1:5002 で動作します。
主な役割:
- 未ログインユーザーにログインボタンを表示する。
- ユーザーをIdPにリダイレクトして認証を依頼する。
- IdPから受け取った認可コードを使って、IDトークンを取得する。
- IDトークンを検証し、ユーザー情報をセッションに保存してログイン状態にする。
# -*- coding: utf-8 -*-
import os
import time
from flask import Flask, request, render_template_string, redirect, url_for, session
from authlib.integrations.flask_client import OAuth

# 開発環境でHTTPを許可
os.environ['AUTHLIB_INSECURE_TRANSPORT'] = 'true'

# ============================================================================
#  OIDC Relying Party クライアントアプリ
# ============================================================================
app = Flask(__name__)
app.secret_key = 'client-secret-key-for-session'

# セッション設定を追加
app.config.update({
    'SERVER_NAME': '127.0.0.1:5002',
    'SESSION_COOKIE_NAME': 'rp_session',  # クッキー名を指定
    'SESSION_COOKIE_SECURE': False,     # HTTP用
    'SESSION_COOKIE_HTTPONLY': False,   # デバッグ用
    'SESSION_COOKIE_SAMESITE': 'Lax',   # 緩い設定
    'PERMANENT_SESSION_LIFETIME': 60  # この設定はJWT基準のセッションでは直接使わない
})

# OIDCサーバーのURL
OIDC_SERVER_URL = 'http://127.0.0.1:5001'

# --- HTMLテンプレート ---
client_home_template = """
<!DOCTYPE html><html><head><title>Client App</title></head><body>
    <h2>Relying Party クライアントアプリ ホーム</h2>
    {% if error %}
        <div style="color: red; border: 1px solid red; padding: 10px; margin: 10px 0;">
            <strong>Error:</strong> {{ error }}
        </div>
    {% endif %}
    {% if user %}
        <p>Welcome, {{ user.name }}!</p>
        <p style="color: #666;">セッションの有効期限(JWT基準): 残り {{ remaining_minutes }} 分 {{ remaining_seconds_part }} 秒</p>
        <pre>{{ user | tojson(indent=2) }}</pre>
        <a href="/logout">Logout</a>
    {% else %}
        <p>Not logged in.</p><a href="/login">Login with OIDC Server</a>
    {% endif %}
</body></html>
"""

# --- Authlib (OAuth) の設定 ---
oauth = OAuth(app)
oauth.register(
    name='my_oidc',
    client_id='client1',
    client_secret='client1-secret',
    server_metadata_url=f'{OIDC_SERVER_URL}/.well-known/openid-configuration',
    client_kwargs={'scope': 'openid profile email api.access rp.login'}
)

# --- クライアントアプリのエンドポイント ---
@app.route('/')
def home():
    user = session.get('user_info')
    error = request.args.get('error')

    remaining_minutes = 0
    remaining_seconds_part = 0

    if user and 'token_exp' in session:
        # JWTの有効期限(exp)を基準に残り時間を計算
        remaining_total_seconds = max(0, session['token_exp'] - time.time())

        if remaining_total_seconds == 0:
            # セッションが期限切れの場合、セッションをクリアしてログアウト状態にする
            session.clear()
            user = None
        else:
            remaining_minutes = int(remaining_total_seconds // 60)
            remaining_seconds_part = int(remaining_total_seconds % 60)

    return render_template_string(
        client_home_template,
        user=user,
        error=error,
        remaining_minutes=remaining_minutes,
        remaining_seconds_part=remaining_seconds_part
    )

@app.route('/login')
def login():
    redirect_uri = url_for('auth', _external=True)
    # prompt='login' を追加して、常にログイン画面を表示させる
    return oauth.my_oidc.authorize_redirect(redirect_uri, prompt='login')

@app.route('/auth')
def auth():
    try:
        # トークンを取得 (stateの検証も自動的に行われる)
        token = oauth.my_oidc.authorize_access_token()
        #  Nonceをセッションから取得
        nonce = session.get('_my_oidc_nonce')

        print(f"DEBUG: Token received: {token}")
        print(f"DEBUG: Token keys: {list(token.keys())}")
        print(f"DEBUG: Has id_token: {'id_token' in token}")

        # IDトークンが含まれているかチェック
        if 'id_token' in token:
            # IDトークンをパースし、ユーザー情報を取得 (expなどのクレームも含まれる)
            user_info = oauth.my_oidc.parse_id_token(token, nonce=nonce)
            print(f"DEBUG: Parsed ID token user info: {user_info}")

            # 取得したユーザー情報とJWTの有効期限をセッションに保存
            session['user_info'] = user_info
            session['token_exp'] = user_info.get('exp', time.time() + 3600)  # デフォルト1時間
        else:
            print("WARNING: No ID token in response, using access token info")
            # IDトークンがない場合はアクセストークンの情報を使用
            user_info = {
                'sub': '1',
                'name': 'Demo User',
                'exp': time.time() + token.get('expires_in', 3600)
            }
            session['user_info'] = user_info
            session['token_exp'] = user_info['exp']

        print(f"DEBUG: Login successful, user info saved: {user_info}")
        return redirect(url_for('home'))

    except Exception as e:
        # エラーハンドリング
        print(f"ERROR in auth callback: {e}")
        import traceback
        print(f"DEBUG: Full traceback: {traceback.format_exc()}")
        return redirect(f"/?error={e}")

@app.route('/logout')
def logout():
    session.clear()
    return redirect('/')

# --- 実行 ---
if __name__ == "__main__":
    print("Starting OIDC Client App at http://127.0.0.1:5002")
    app.run(port=5002, debug=True)
コードのポイント
OAuthクライアントの登録:oauth.register(...)でIdPの情報を登録しています。ここで最も重要なのがserver_metadata_urlです。RPは、このURLを使ってIdPから設定情報を自動取得するため、個別のエンドポイントURLをハードコードする必要がありません。/loginエンドポイント:oauth.my_oidc.authorize_redirect(redirect_uri)を呼び出すことで、ユーザーをIdPの認可エンドポイントにリダイレクトさせます。このとき、CSRF対策のためのstateパラメータなどが自動で付与されます。フローの(2)を担当します。/authエンドポイント: 認証後のコールバックURLです。oauth.my_oidc.authorize_access_token()を実行すると、ライブラリが裏側で以下の処理をすべて行ってくれます。- リクエストに含まれる
stateを検証 code(認可コード)を取得- IdPのトークンエンドポイントに
codeを送信してIDトークンとアクセストークンを要求(フローの(8)) - 受け取ったIDトークンを返す(フローの(9))
- リクエストに含まれる
- IDトークンのパース:
oauth.my_oidc.parse_id_token(token, nonce=nonce)で、受け取ったIDトークン(JWT形式)を検証し、中の情報(Claims)を展開します。nonceの検証もここで行われます。フローの(10)に相当します。 - セッション管理: パースして得られたユーザー情報をFlaskのセッションに保存し、ユーザーのログイン状態を維持します。
実行中のブラウザ画面イメージ
プログラムを動かしてみよう
それでは、実際にこの2つのプログラムを動かして、OIDCのフローを体験してみましょう。
- ターミナルを2つ開きます。
- 1つ目のターミナルでIdPサーバーを起動します。
コマンド:python OIDC_idp.pyのようなメッセージが表示されます。
→ Running on http://127.0.0.1:5001/ - 2つ目のターミナルでRPアプリケーションを起動します。
コマンド:python OIDC_rp.pyのようなメッセージが表示されます。
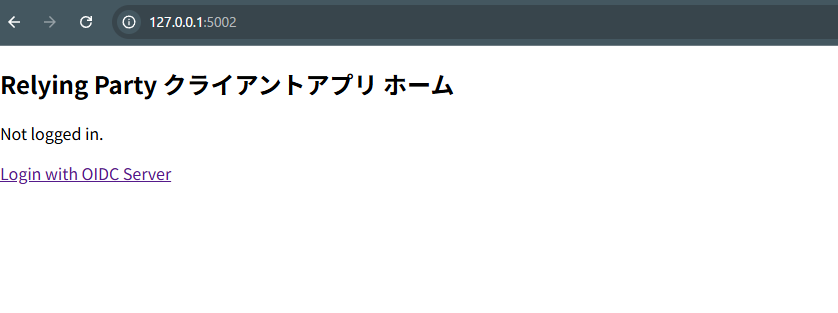
→ Running on http://127.0.0.1:5002/ - ブラウザでRPにアクセスします。
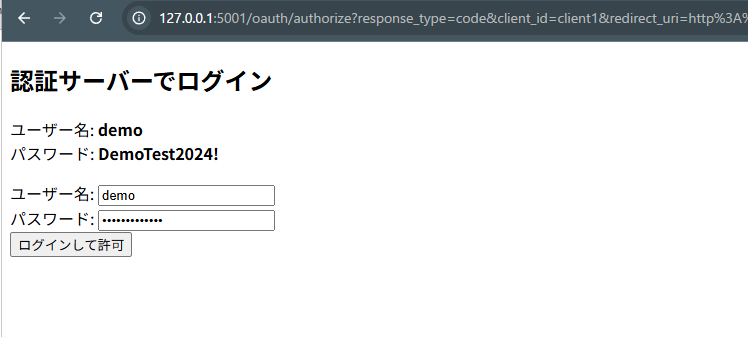
http://127.0.0.1:5002を開いてください。 - 「Login with OIDC Server」をクリックします。
IdPのログイン画面 (http://127.0.0.1:5001) にリダイレクトされます。(ユーザー名, パスワードは、簡単の為、画面表示しています) - ログイン情報を入力して「ログインして許可」をクリックします。
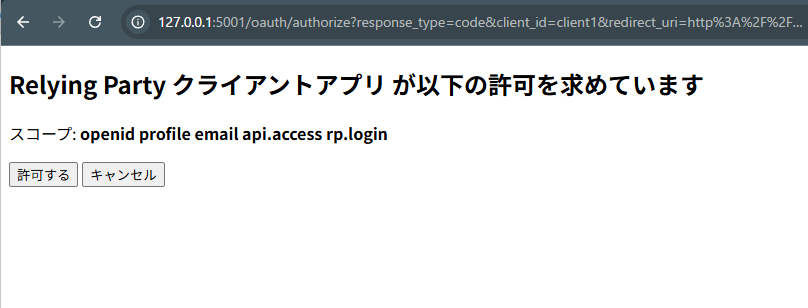
すると、アプリケーションへの情報提供の同意画面が表示されます。 - 「許可する」をクリックします。
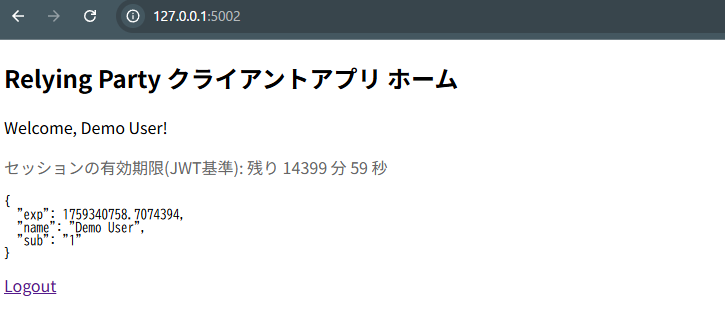
IdPでの処理が完了し、ブラウザはRPのコールバックURL (/auth) を経由して、最終的にRPのホーム画面 (/) に戻ってきます。今度はログイン後の状態で、ユーザー情報が表示されているはずです。
これで、OIDCの一連の認証フローを体験できました。
考察:サンプルから本番実装へ
今回のサンプルはOIDCの基本的な流れを理解するために、多くの部分を簡素化しています。実際のアプリケーションを構築する際には、以下のような点を考慮する必要があります。
1. データの永続化
サンプルでは、ユーザー情報やクライアント情報、認可コードなどをすべてメモリ上の変数に保存しています。これではサーバーを再起動すると全ての情報が失われてしまいます。本番環境では、これらの情報をデータベース(PostgreSQLやMySQLなど)に保存し、永続化する必要があります。
2. IDトークンの署名アルゴリズム
サンプルでは、IDトークンの署名に HS256 という共通鍵暗号方式(IdPとRPが同じ秘密鍵を共有する方式)を使用しています。これはシンプルですが、RPが増えるたびに秘密鍵を安全に共有する必要があり、管理が煩雑になります。
本番環境では、RS256 などの公開鍵暗号方式(非対称鍵暗号方式)を利用するのが一般的です。
- IdP: 秘密鍵でIDトークンに署名します。
- RP: IdPが公開している公開鍵を使って署名を検証します。公開鍵はIdPの
jwks_uriエンドポイント(.well-known/openid-configurationに記載)から取得できます。 これにより、RPは秘密鍵を知ることなく署名を検証できるため、よりセキュアな構成になります。
3. NonceとStateの厳密な検証
state パラメータはCSRF攻撃を防ぐために、nonce パラメータはリプレイ攻撃を防ぐために重要です。
- State:
authlibが自動で処理してくれますが、リクエストとコールバックで同一のstate値が維持されることで、意図しない第三者によるリクエストでないことを保証します。 - Nonce: RPは認証リクエストごとに一度しか使えないランダムな値を生成し、セッションに保存します。IdPから返されたIDトークンに含まれる
nonceとセッションの値が一致することを確認する必要があります。サンプルのexists_nonce関数は常にTrueを返していますが、本番ではこの検証を厳密に行う必要があります。
4. PKCE (Proof Key for Code Exchange) の追加
今回のサンプルでは実装していませんが、本番環境、特にSPA(Single Page Application)やモバイルアプリのようなclient_secretを安全に保持できないパブリッククライアントを扱う場合、PKCE (Proof Key for Code Exchange) という拡張仕様への対応が不可欠です。
PKCEは、認可コードを不正に傍受される「認可コード横取り攻撃」を防ぐための仕組みです。たとえ認可コードが漏洩しても、攻撃者はトークンを取得できなくなります。この仕組みは RFC 7636 で標準化されています。
現在では、client_secretを持つサーバーサイドアプリケーション(コンフィデンシャルクライアント)であっても、多層的な防御の観点からPKCEを併用することが推奨されています。本番実装では、セキュリティを強化するためにPKCEの導入を検討すべきです。
5. ログアウト処理
サンプルでは、RPの /logout エンドポイントでローカルのセッション (session.clear()) をクリアしているだけです。これでは、IdP側ではログインしたままの状態です。
完全なシングルログアウト(SLO)を実現するには、RPのログアウト時にIdPが提供する end_session_endpoint にリダイレクトする必要があります。これにより、IdP側のセッションも破棄され、他の連携サービスからも一貫してログアウトできます。
まとめ
今回は、Pythonのサンプルコードを通してOIDCの認証フローを具体的に見てきました。
- OIDCはOAuth 2.0を拡張した認証の仕組みであること。
- RP (クライアント) と IdP (認証サーバー) が連携して認証を行うこと。
Authlibのようなライブラリを使えば、OIDC Discovery のおかげでRP側の設定が非常にシンプルになること。- 認可コード、IDトークン、アクセストークンといった要素が、セキュアな認証フローの中で重要な役割を果たしていること。
これらの点が、コードレベルで少しでも実感いただけたなら幸いです。 実際のサービスでは、この記事の「考察」で触れたような、より堅牢な実装が必要になりますが、基本的な流れは今回のサンプルと同じです。
ぜひ、お手元でコードを動かして、自分なりにカスタマイズしてみてください

